- Washi Tape Tip
- Stampin' Up! Gift boxes
- Final Week to order from current catalogs
Washi Tape Tip
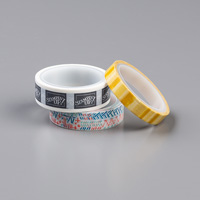
Today I wanted to do a quick post with a tip for keeping your washi tape together with its name and product number for quick reference. I need to know the name of the washi tape I'm using for card or project recipes, so I don't want to separate my rolls from the packaging labels. I purchased from Office Depot a box of 2" Book Rings. Then I save the front and back labels when I open the package and back each with a circle punched out of Whisper White Cardstock.

Then I punch a small hole in each label, and add the washi tape and labels onto a 2" Book Ring. This keeps them together for classes and the labels are available for easy reference when I'm looking for the name of the washi tape.

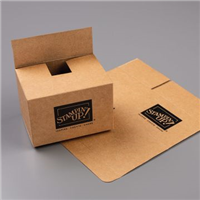
Oh! Did you notice the cute miniature Stampin' Up Shipping boxes sealed with Stampin' Up! Washi tape in the background of my first photo? Why, YES! These will be available in the new catalog. These are so cute! I just had to pick up this little UPS truck to use on my display tables with these cute Stampin' Up! shipping boxes.

These miniature boxes fold together at the bottom. Note the upside down Stampin' Up! logo in the open package above.

Then you turn it over so the logo is right side up and seal the top with this darling stampin' Up! washi tape. The Stampin' Up! logo tape is from the Follow Your Art washi tape collection. You are going to love putting small treats or Stampin' Up! gift items in these boxes and giving them to the receptionist at the dentist office, the service representative at your car dealership, or the nurse at your doctor's office. It's a great way to get a conversation started about Stampin' Up!
Another reminder: Be sure to pick up any items on your Wish List retiring when the current catalogs -- both the annual catalog and the Occasions catalog -- expires on Jun 3. You can begin ordering from the new catalogs on June 4.
Take a closer look at these items by clicking on the images below. You'll be able to place an order for these items on June 4. Add them to your wish list now!
Add Mini Shipping Boxes to your new catalog order
Are you working on your new catalog order? I know I am. I keep finding new things from the new Stampin' Up! catalog that I didn't notice on my first and second pass through the new catalog. I'm definitely going to order more of these fun Mini Stampin' Up! Shipping Boxes and washi tape. You'll want to have your Shopping List ready to place your order early in the ordering queue when the new catalog launches on June 4. You can even select Overnight shipping or 2-Day shipping to get your new catalog order earlier. Just select your shipping preference on the first page of your order.
Important information about ordering on June 4. On June 4, 2019, ordering will be unavailable from 1 AM until 1 PM Central Time to transition the system to the new catalog. Ordering from the new catalog will begin at 1 PM central of June 4
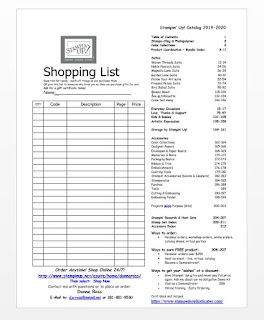
Download this handy Shopping List which includes an index to key sections of the new catalog. One change I've found really useful in this year's new Stampin' Up! catalog is a section towards the front of the new catalog listing all of the bundles in one place. If a bundle includes a suite of coordinating products, the page number is listed with the bundle. This makes it so each to find all of the coordinating products, and to place an order that saves you money on your new bundles. If you're looking for savings and a way to earn the most shopping rewards with your orders of $150+ (not including shipping and tax), bundles are a great way to maximize your purchases. You save 10% when ordering a coordinating Stamp Set and Dies or Punches together as a bundle.
Are you working on your new catalog order? I know I am. I keep finding new things from the new Stampin' Up! catalog that I didn't notice on my first and second pass through the new catalog. I'm definitely going to order more of these fun Mini Stampin' Up! Shipping Boxes and washi tape. You'll want to have your Shopping List ready to place your order early in the ordering queue when the new catalog launches on June 4. You can even select Overnight shipping or 2-Day shipping to get your new catalog order earlier. Just select your shipping preference on the first page of your order.
Important information about ordering on June 4. On June 4, 2019, ordering will be unavailable from 1 AM until 1 PM Central Time to transition the system to the new catalog. Ordering from the new catalog will begin at 1 PM central of June 4
Download this handy Shopping List which includes an index to key sections of the new catalog. One change I've found really useful in this year's new Stampin' Up! catalog is a section towards the front of the new catalog listing all of the bundles in one place. If a bundle includes a suite of coordinating products, the page number is listed with the bundle. This makes it so each to find all of the coordinating products, and to place an order that saves you money on your new bundles. If you're looking for savings and a way to earn the most shopping rewards with your orders of $150+ (not including shipping and tax), bundles are a great way to maximize your purchases. You save 10% when ordering a coordinating Stamp Set and Dies or Punches together as a bundle.
Want more motivation for creating cards? Join my Meetup Site and you'll receive notification of my upcoming classes.
- To place an on-line order, 24 X 7
- Want to purchase at a discount? Sign up for $99 and get $125 worth of product you select from current catalogs in your starter kit.
- Download a free 2018-2019 catalogs.
- Follow my card ideas and upcoming classes by subscribing to my blog, register on my Meetup site, or by following me on Instagram or Facebook.
- Clearance Rack - Products available while they last
Enjoy!
Donna Ross
Stampin' Up! Independent Demonstrator
To place an order: Place an on-line order through my Stampin' Up! store - 24/7 Shopping