Showing posts with label Valentine's Day. Show all posts

Tuesday, January 23, 2018

Bloomin' Love Stamp Set from Stampin' Up!

  • Valentine Card
  • Select a free Sale-A-Bration gift with $50 order
  • Join Stampin' Up! and get an additional Two Free Stamp sets

L - O- V- E


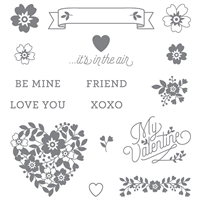
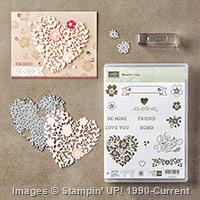
I'm always sad when one of my older stamp sets sits idle while I play with newer sets.  One of my all-time favorite Valentine sets is the Bloomin' Love Stamp set, which is page 88 of the main Stampin' Up! catalog.  This set coordinates with the Bloomin' Heart Thinlits but today I paired it with the Large Letters Framelits to make this card.      


The card uses a Thick Whisper White base card, then a layer of Powder Pink and then a layer of regular Whisper White.  I stamped the regular Whisper White with the heart from Bloomin' Love and then used the Large Letter Framelits to cut out the word LOVE.  After cutting out the letters I popped them up on the foam adhesive strips, which causes them to stand off the page and allows the Powder Pink layer to show when looking at the card from the side. 


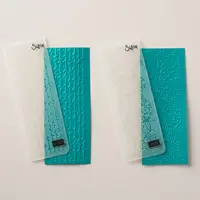
The Thick Whisper White background is dry embossed with the Petal Pair Textured Impressions Embossing Folder, a new embossing folder on page 23 in the Occasions catalog.   

Below is the inside of the card.  The top of the inside was also embossed just at the top with the Petal Pair Textured Impression Plate.  The Be Mine sentiment is from the Bloomin' Love stamp set, as is the small stamped flower on the left side of the page.      


Recipe:


Stamp:   Bloomin' Love Stamp Set
Ink:  Powder Pink
Paper:  Thick Whisper White, Powder Pink, Whisper White 
Accessories:  Foam Adhesive Strips, Large Letters Framelits, Petal Pair Textured Impressions Embossing Folder, Big Shot, Big Shot Platform, Standard Cutting Mats, Paper Snips, Bone Folder, Silicone Craft Sheet, Stampin' Pierce Mat, Stampin' Trimmer, Multipurpose Glue, 


Need to order any of the supplies used in today's projects?  Click on an image below to see larger product images and/or to go directly to my Stampin' Up! store.
Price: $110.00
Price: $10.00
Price: $7.00


Stay up-to-date with new card ideas by subscribing to my blog, register on my Meetup site for notification of future classes, or follow me on Instagram

Catalog Downloads 

Do you have the current Stampin' Up Catalogs?  To download a free copy of the Occasions catalog and the Sale-A-Bration Catalog, click here.   


Learn about Sale-A- Bration

Select free gifts with every $50 purchased. Pick a free selection from the Stampin' Up! Sale-A-Bration brochure.  Free paper; free scrapbooking cards, free stamp sets; free ribbons.  You'll love the selection.  

Ready to place an order?


2.  Order over $150 (not including tax and shipping), qualify for shopping rewards. This is free merchandise you select from the current catalogs and add to your order.

3.  Orders over $50 (not including tax and Shipping), qualify for Sale-A-Bration Rewards

4.  Is your wish list is over $100?  The $99 Starter Kit is one way to save on your purchase today, and save even more on future orders.  You can order $125 worth of product for $99 plus two free stamp sets until March 31.  After your initial $99 order for merchandise you select from anything in the current catalogs, place an order for the remainder of your wish list as a demonstrator, and save 20% on future purchases.  Need help building your shopping list? Give me a call and we'll work through your starter kit order together. 

5.  Place an on-line order through my Stampin' Up! store - 24/7 Shopping.  I would love to be your Stampin' Up! demonstrator if you don't already have one.  Let me know if you need an Occasions and Sale-A-Bration Catalog. 

6.  Clearance Rack items - while quantities last.


7.  Order current or previous Paper Pumpkin monthly craft kits. 


Enjoy!


Stampin' Up! Independent Demonstrator

Private Classes for 1 or a small group of friends:  http://cardmaking.meetup.com/71/
To place an order: Place an on-line order through my Stampin' Up! store 24/7 Shopping 


Sunday, February 12, 2012

Valentine's Day Countdown

  • Full court press to complete Valentine's projects
  • Love Bots Download
  • My Digital Studio Express Software use Free for 30 days!

My sweet husband surprised me with two cards this weekend.  One for our Anniversary and another for Valentine's Day.   My husband doesn't buy cards for the intended celebration.  He buys cards that appeal to him and the receiver.  One card was really a Dr. Suess birthday card.  He just draws through the sentiment and writes his own.  The surpise was that the Valentine's Day card was an actual Valentine's day card...and a cute one at that!  Good job, Dear Husband!   

I'm down to the wire, now, on finishing cards for Valentine's Day.When your hobby is card making, its expected that you'll send wonderful hand-made cards for the holidays.  This card is a real time-saver, yet it sparkles and looks like cards taking much longer to make.

I used the Designer Cuts Cards & Envelopes from the Occasions Mini (125414).  I cut it apart, cut it down to 4 X 5-1/4, added a piece of Real Red Glitter Paper behind the laser heart cutout, and mounted the card on a Basic Black base card.  Before mounting I ran the card front through the Big Shot using the hearts from the Adorning Accents Textured Imrpessions Embossing Folder set and tied a Real Red Satin Ribbon across the bottom. Then I used the left over piece from the Designer Cuts, also cut to 4 X 5-1/4 and used it  inside my card.  Perfect for making very fast cards.  The laser cut set of cards and envelopes make ideal wedding, bridal show or Valentine cards and come with two different laser cuts.


Recipe
Stamps: P.S. I Love You (Sentiment)
Paper:   Basic Black, Designer Cuts Cards & Envelopes Set (125414), Real Red Glitter Paper (121790 - a carryover product from the Holiday Mini that is still available)
InksReal Red
Accessories:  Adorning Accents Textured Impressions Embossing Folder (125601), Big Shot, Small Oval Punch (120908), 5/8" Real Red Satin Ribbon (117286), Dimensionals

New Downloads for My Digital Studio are released every Tuesday. The January 17 Download included a template and images for one of the cute boxes offered by Stampin' Up! from one of the past catalogs. . . the valentine Love Bot treat boxes set (129343). I downloaded it as soon as I saw it, but didn't get a chance to play with it until just now.

I love that the box includes the template image so you can create all of your embellishments in what ever color or Designer Series Paper you want to use from My Digital Studio, or you can use the many elements that come with the kit.

Here's a couple of these cute boxes. The one on the left I created from the template alone, adding a background paper in a color that would match my cards and My Digital Studio design software (MDS) stamps and punch elements to create my To: - From: box. Once assembled, I added a pleated ribbon, embossed hearts and Silver Glitter paper.


The treat box on the right (above and below) uses the elements from the Love Bots kit (129343). I added a ribbon band that slides on and off to hold down the box flap. The template and kit embelishments make this an extremely versatile purchase since it can be used for fun, cute children's Valentine Treats (or Birthday treats) or you can use just the template and create matching treat boxes that are more sophisticated and match the papers and colors in your cards.

Here's a great idea if you're pressed for time and still need to help your children make treat boxes for their class mates for Valentine's Day or other occasions.  Take advantage of the free 30-day of the My Digital Studio Express Software.  (See details below on how to download and begin using today!).  Then order and download the Love Bots Kit (129343) for just $4.95.  You'll be able to use the box template, 11-piece stamp brush set, and 20 embellishments today.  What a great project for you and your Children to work on together!

Free 30-day trial of My Digital Studio Express

Here are the details for the free 30-day trial of My Digital Studio Express. Digital designing is one of the hottest crafting trends right now!. You'll enjoy mixing traditional stamping with digital designing and you can download the software and start using it immediately.


Item 129600-  My Digital Studio Express Trial


The free trial includes the My Digital Studio Express software.  This means you'll have full design functionality, access to the Stampin' Up! print services, and the opportunity to purchase My Digital Studio downloads.

At the end of the 30-day trial period, you can purchase either the My Digital Studio or My Digital Studio Express to continue using the software.  You will not need to re-download the program, but will simply enter the product key you received after purchasing the software ( If you purchase the disc version you'll find the key along with the shipped software, and if you purchase the downloadable My Digital Studio Express, you'll receive the product key via email.)

You'll be able to keep any downloads you purchase during the 30-day trial period for enhancing your My Digital Studio Experss software.

To get the free trial version, add My Digital Studio Express (item 129600) to your online shopping cart, and then download and install it.

http://www.mydigitalstudio.net/:  This website is designed for demonstrators and customers alike. It's the place to go for all things My Digital Studio! On this site you will find training videos, sample projects from other My Digital Studio users, a discussion forum, and the full Stampin' Up! digital catalog along with many other useful My Digital Studio tools.  

My Digital Studio and My Digital Studio Express video: This video will help you learn the difference between the My Digital Studio and My Digital Studio Express programs. 
Complete list of My Digital Studio Express downloads: This resource lists all the downloads included in the My Digital Studio Express software. It's a helpful resource to have available when your customers ask what downloads are included in the 30-day trial.
  
My Digital Studio print pricing and specifications: This resource is a great reference not only for print pricing, but also to see the plethora of print products available through My Digital Studio.  You'll be excited by all the printing possibilities!

Order more downloads or other Stampin' Up! merchandise during Sale-A-Bration and Earn free items for every $50 you spendBest time of the year to restock your supplies or order those sets you've wanted for Spring projects is during Sale-A-bration  Get free merchandise while you're buying what you need! For every $50 you spend from Jan 24 - Mar 31, 2012, you receive a free product from the Sale-A-Bration catalog.  Download a free copy of the Sale-A-Bration brochure now to see what you can earn.

If you haven't yet purchased from the new Occasions mini catalog, you'll earn extra rewards when you select your free products with every $50 you spend from the Sale-A-Bration brochure.  

Enjoy!


Donna Ross
Stampin' Up! Independent Demonstrator
To place an order: http://www.stampinup.net/esuite/home/donnaross/ - 24/7 Shopping at my Stampin' Up! Website

Sunday, February 13, 2011

Letters to Juliet Inspiration

I was inspired this week end to finish my Valentine projects after watching Letters to Juliet .  If you haven't yet seen the movie-- I know I'm probably the only person who hasn't seen it yet--its about the fact that its never too late for love...a timely theme as I thought of all the people I wanted send a greeting to tell them how much I love them.  Especially my darling husband who puts up with my mess as my creativity ebbs and flows.    I have a five quick projects to show you today.  They were so much fun!

Decore Accent Blocks
I found a piece of fabric at a local fabric store and thought it would be perfect to showcase a number of Stampin' Up embellishments and products.  I decided to use the fabric to cover a set of Decore Accent Blocks in a Valentine theme.


I started with a set of the Decore Accent Blocks (116829) and a set of the Sticky Pages (114300).  I cut both the fabric and the sticky pages into 3" X 3" squares.  I covered each square with the sticky sheets, and then removed the backing and added the fabric.  The blocks are a kraft color and the sticky sheets make them look pink.

Once each square was covered with fabric, I chose different embellishments for each block.  This block uses 5/8" grosgrain ribbon in Regal Royal and I also added three of the Vanilla Rosettes (118774) from the Occasions Mini Catalog and applied glue dots to hold them in place.

For this block, I used one of the Game Spinner Hands (121893) as a Cupid's Arrow and one of the Flower buttons from the Sale-A-Bration brochure.  Every time I look at it I think of another way to use these cute arrows.  I was surprised to find that I could lift the fabric so that I could punch a small hole for the brad so that the legs are hidden on the back side of the fabric.  The fabric went right back on top of the sticky sheet as firmly as the first time I put it in place.
 For the third block, I used the 3/8" Pretty in Pink taffeta ribbon to make a bow.  A glue dot holds it in place. I also added a few of the small pearls from the Basic Pearls Pack (119247) from the Stampin' Up Catalog and Idea book.
On the final block I added the Vintage Flower Adornment in Rose Red (121829).  I was so lucky to find a piece of fabric that worked so well with so many shades of pink and all of our accessories!

My Digital Studio Hybrid
A few weeks ago, I created a Thank-you card in My Digital Studio software.  Using that card as a template, I quickly change the background papers and sizes and a few images to create this card front.  Then I stamped the heart stamp and filled it with Designer paper to create a page of hearts.  I punched out the hearts with the heart stamp, and glued 5 of them together to make the 3-dimensional heart on the front of the card.


Oh!  Before I forget... on Feb 09, Stampin' Up! introduced a new .pdf catalog of all the images available in My Digital Studio software.  Some images are available with the Application CD; others are available for purchase separately.  What a time saver!!  Now you can visually see all of the images in one place.  As a demonstrator, I saw an early copy of the .pdf, and I can't tell you how many times I've already opened it for a closer look at the images in my My Digital Studio library -- some I didn't know I owned! 

Little White Tin Mail Box
It wouldn't be Valentine's Day without dressing up one of these little tin mail boxes.  Several years ago, I found a supply of them and bought an entire case.  Since then, I have seen many other mailbox tins at much higher costs.  I'm so glad I purchased in bulk when they were available.  These are perfect for candy treats as well as small 3X3" cards or Gift Cards.


I used the Love Impressions (121780) Designer Series paper from the Occasions Mini Catalog to cover the body and for the heart on the mail box.   I punched the mailbox flag hart using the Full Heart Extra-Large punch (119883). I used some of the images from Love You Much (113756) for the front of the mailbox, and images from Filled with Love (121154) from the Holiday Mini for the Feb {Heart}14 image on the mailbox flag, popped on a Dimensional and a small tab of Pretty in Pink Taffeta Ribbon on one side to match the Pretty in Pink Taffeta Ribbon on the arm of the mailbox.  A large red striped bow sits on top of the mailbox, made from 1-1/4" Striped Grosgrain Ribbon (119768)

Be My Valentine Treat Jar
This cute little jar from the Container Store is the perfect size for decorating with a few bows and a couple of stamped images.  I used one of the striped designer papers from the Subtles Patterns Designer Series Paper Stack (117152).  I inked To & From Tag with Regal Rose and then carefully wiped off the To: and From: before I stamped the striped paper.  Instead I used the Be My Valentine stamp from the Filled with Love (121154) set from the Holiday Mini for my sentiment.  I added a small punched heart with a very small diamond in the corner and attached the tag to the Regal Rose grosgrain Ribbon and Petty in Pink Satin Ribbon.  The container is filled with sweet treats and I love that the whole project took only about 15 minutes to assemble. 

I'm wondering if I can give these two together as a set. If I had thought ahead, I probably would have used coordinating papers and ribbons between the two projects.  I often find that I'll get inspired to begin another project as I'm in the middle of one project and work on them together, and then I end up with projects that work together;  Unfortunately, these two didn't come together like I thought they would.


Pompom Love Treat Bottle
This is another unusual glass bottle with a plain clear top that made me want to cover it with something.  I took a couple of strips of sticky strip and covered the bottle cap and then cut two strips of pompoms from the new Melon Mambo PomPom Trim and stuck it to the sticky strips. 


After filling the jar with hearts, I added a very small bow and a tag with a small heart.  I punched out the tag with the Jewelry Tag Medium Punch (117190).  The bow is 1/8" Pretty in Pink Taffeta Ribbon with white trimmed edges.  The tag is from Tiny Tags as is the {love} image.  The heart with xo is from a page of heart images I found when I did a search on "hearts" in My Digital Studio.  I wasn't sure which I wanted to use, so I made a page of different heart shapes, duplicated them, colored them in different shades of pinks and reds, and printed them on a piece of Whisper White card stock on my home printer.  This one found its way onto the small label for this project.


Here's the little treat jar with a card I made with Melon Mambo card stock a week ago.  Another fun, little gift complete.

We'll, that's enough for one day.  Hope you enjoyed these projects.